

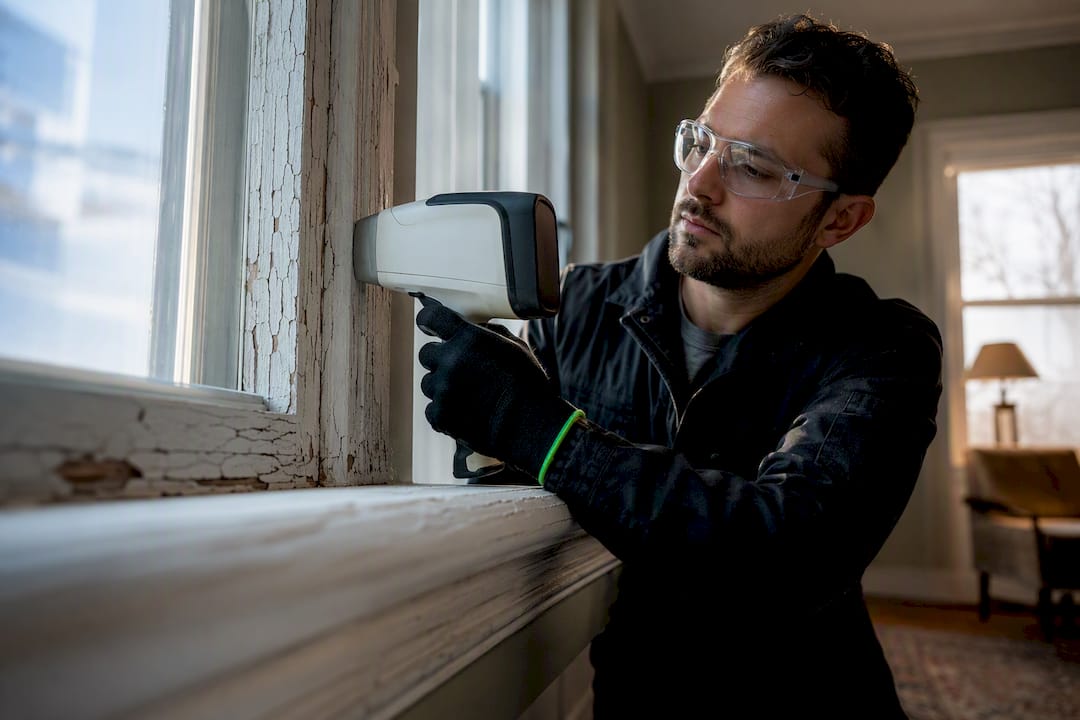
Test now if your home was built before 1990, you’re planning a renovation or sale, or children or pregnant people live there. Your main options are a certified XRF survey, lab paint-chip analysis, dust-wipe sampling, or a home kit as a first screen. For anything tied to health, a sale, or a legal obligation, hire a certified tester and confirm through an accredited lab.
TL;DR:
- Homeowners renovating or planning to sell should prioritize testing in homes built before 1990, especially if paint shows deterioration or children or pregnant individuals are present.
- XRF surveys are useful for quick, non-damaging mapping of lead on painted surfaces, but lab analysis provides the most definitive results for specific spots.
- Dust-wipe sampling is essential for assessing active lead hazards, particularly after renovation or remediation, and results must be interpreted alongside paint condition.
- Home test kits can serve as initial filters but should be confirmed with accredited lab tests before making any remediation decisions or legal claims.
- Certified testing and remediation professionals offer the most reliable process, including proper sampling, reporting, and clearance testing, crucial for legal and health assurances.
Table of Contents
- Quick checklist: do you need to test now?
- Testing methods explained: XRF, lab analysis, dust wipes and home kits
- How to interpret lead paint testing results
- If lead paint is found: what to do immediately
- Typical costs and timeline for lead paint testing
- Choosing a qualified lead paint professional
- Why hire a certified hazardous-materials contractor
- Official guidance and accredited lab resources
- The gap between what testing promises and what homeowners actually do with it
- Get certified testing and remediation done right
- Sources
- FAQ
Quick checklist: do you need to test now?
Age is the biggest predictor of risk. Canada restricted lead in residential paint decades ago, so most homes built before 1990, and especially before 1960, deserve a closer look before you drill, sand, or scrape a single wall.
A few situations move testing from “should” to “must”:
- You’re renovating, especially anything involving sanding, scraping, or demolition of old painted surfaces.
- Paint is peeling, chipping, or chalking anywhere in the home.
- Children under six or pregnant people live in or regularly visit the property.
- You’re selling, buying, or managing a rental where disclosure or liability could come into play.
Start with window sills, door frames, stair rails, porches, and any edge where paint rubs or friction wears it down. These spots generate the most dust, and dust is how lead paint hazards actually reach people. A home kit can help you triage which rooms deserve attention first. If anything looks deteriorated or you’re planning renovation work, skip the screening step and go straight to a professional test.
Testing methods explained: XRF, lab analysis, dust wipes and home kits
Each method answers a different question, and knowing which one you need saves both time and money.
- XRF (X-ray fluorescence) surveys scan painted surfaces without damaging them, which makes them ideal for mapping an entire house room by room. HUD guidance notes that XRF results are reported in milligrams per square centimetre, and accuracy depends heavily on operator training and how the device is calibrated against the substrate being tested. Metal, plaster, and wood can all produce slightly different readings, which is why trained inspectors reference the instrument’s own performance characteristics sheet before finalizing results.
- Lab paint-chip analysis involves cutting a small sample down to the substrate and sending it to an accredited lab. This is the gold standard for a single, disputed, or legally significant surface. SGS, among other accredited labs, notes that this kind of analysis produces legally defensible data because it follows standardized instrumentation and chain-of-custody protocols.
- Dust-wipe sampling measures lead in settled household dust rather than the paint itself. It’s the method used to confirm an active hazard or to clear a property after remediation work.
- Home test kits use a chemical reaction to flag lead in paint on the spot. They’re useful as a first pass, but NIST’s laboratory evaluation of spot-test kits found real performance gaps between products, including both false positives and false negatives depending on paint colour and substrate.
Pro Tip: Treat a positive home kit result as a starting point, not a final answer. Send a chip from the same spot to an accredited lab before you plan any remediation budget around it.
How to interpret lead paint testing results
Lab reports and XRF readings use two different units, and mixing them up leads to bad decisions. Paint-chip results are usually given as percent by weight, while XRF readings are given in milligrams per square centimetre (mg/cm²). Both trace back to reference values commonly cited in HUD and EPA guidance include thresholds around 1.0 mg/cm² or 0.5% by weight typically used to classify paint as lead-based.
- A positive XRF reading at or above the reference value means lead-based paint is present at that spot.
- A negative reading means it wasn’t detected there, though nearby surfaces with different substrates can still test differently.
- An inconclusive reading, common near the threshold or on tricky substrates, calls for a follow-up paint-chip sample sent to a lab rather than a guess.
It’s worth repeating a point Health Canada makes clearly: the presence of lead paint doesn’t necessarily indicate a hazard. Intact, well-sealed paint poses far less risk than deteriorating paint generating dust and chips. Dust-wipe clearance criteria measure exposure risk, not just presence, which is why a “positive paint, clean dust” result is possible and meaningful. When results affect a sale, a tenancy, or a child’s health, request a formal risk assessment rather than relying on a single reading.
If lead paint is found: what to do immediately
Don’t panic, but do change your habits in that space right away.
- Limit access to the area, especially for kids and pregnant occupants.
- Wet-wipe surfaces regularly instead of dry sweeping or vacuuming with a standard vacuum.
- Never dry sand, scrape without containment, or use a heat gun on suspected lead paint. All three release airborne lead dust.
- Cover or seal peeling paint temporarily until a permanent fix is scheduled.
From there, you’re choosing between interim controls and full abatement. Encapsulation (sealing paint under a specialized coating) or temporary enclosure works for surfaces in reasonably good condition where full removal isn’t urgent. Abatement, meaning removal or replacement of the painted component, is the answer when paint is failing, when a child-occupied space is involved, or when a sale requires a clean bill.
DIY removal is genuinely risky here. Dry sanding an old painted door can put more lead dust into a house in an afternoon than years of an intact painted surface ever would. Certified abatement crews contain the work, and a proper job ends with clearance testing: post-work dust-wipe samples sent to an accredited lab to confirm the space is safe to re-occupy.
Pro Tip: Keep every lab report and clearance certificate from remediation work. If you sell the property later, that paperwork answers questions before a buyer’s inspector even asks them.
Typical costs and timeline for lead paint testing
Costs vary by region and by how many testing methods you combine, but the general pattern holds across most Canadian markets. Home kits are the cheapest option, running a modest amount per test strip and available at most hardware stores. A single lab paint-chip analysis costs more, since it involves accredited lab processing and a formal report, but it’s still a relatively affordable way to confirm one specific surface. A full XRF survey of an entire property costs the most upfront, reflecting the inspector’s time, equipment calibration, and the number of readings taken room by room.
- Lab turnaround for paint-chip and dust-wipe samples typically runs from a few days to about two weeks, depending on the lab’s queue.
- Certified inspectors often book out in advance, especially during peak renovation and real-estate seasons.
- Total cost climbs with the number of methods combined, the need for post-remediation clearance testing, and the overall size of the remediation scope.
Budget for testing and a possible follow-up round. A screening kit that comes back positive almost always means a second, more precise test is coming.
Choosing a qualified lead paint professional
A good tester should be transparent about their process before you ever sign anything.
- Ask which accredited lab they use and request the lab’s accreditation identifier, not just a name.
- Confirm the inspector or risk assessor holds relevant certification and that their XRF analyser has current calibration records.
- Ask exactly how results will be reported: units, reference values used, and whether the report distinguishes inspection findings from a risk assessment.
- Confirm whether clearance testing is included after any remediation work, and get that in writing.
- Request references from recent jobs, ideally ones involving a property sale or rental, where documentation mattered.
Red flags are easy to spot once you know what to listen for: a tester who won’t name their lab, gives vague answers about sampling locations, or pushes you toward a handful of spot checks instead of proper coverage. Pressure to skip clearance testing after remediation is one of the biggest warning signs of all.
Why hire a certified hazardous-materials contractor
Certified hazardous-material removal and environmental testing involve trained technicians using specialized equipment to meet recognized industry standards. That combination matters because certified technicians paired with accredited lab analysis produce reports that hold up under scrutiny, whether that’s a real-estate transaction, a tenant dispute, or a renovation permit review.
Here’s what a homeowner should reasonably expect from that kind of contractor:
- Documented sampling locations and methodology, not just a verbal summary.
- Results run through an accredited lab, with report units clearly explained.
- Clearance testing after any remediation, confirmed in writing.
- A written report you can keep on file or hand to a buyer, lawyer, or insurer.
| What to expect | Why it matters |
|---|---|
| Documented sampling protocol | Makes results defensible if questioned later |
| Accredited lab analysis | Produces legally credible data for sales or disputes |
| Post-remediation clearance testing | Confirms the space is actually safe to re-occupy |
| Written final report | Protects you in future transactions or tenant issues |
Official guidance and accredited lab resources
Keep these on hand as reference points, not just reading material:
- Health Canada’s guidance on lead-based paint covers general risk information and how to arrange lab analysis.
- NIST’s evaluation of spot-test kits is worth a read before you buy any home kit off the shelf.
- SGS’s lead and metals analysis services illustrate what accredited lab reporting actually looks like.
- Property managers should also review property owners liability considerations once testing and remediation records exist, since documentation affects coverage.
Keep every lab report and clearance certificate somewhere you can find it in five years, not just five days.
The gap between what testing promises and what homeowners actually do with it
Most advice on this topic treats testing as the finish line. It isn’t. A lab report or an XRF reading is only useful if someone acts on it correctly, and that’s where the conventional wisdom gets shaky. People treat a home kit’s negative result as a clean bill of health when it might just mean the kit missed something on that particular substrate, a limitation NIST’s own evaluation documented plainly.
The bigger blind spot is the presence-versus-hazard distinction. Homeowners hear “lead paint found” and assume immediate danger, or hear “no hazard identified” and assume the paint itself is gone. Neither is quite right. Intact painted trim from 1975 sitting untouched for another decade poses a very different risk than that same trim under a belt sander. The paint’s condition and what you’re about to do to it matter as much as the number on the report.
If there’s one thing worth prioritizing over everything else in this article, it’s this: match the test to the decision. A quick kit is fine for deciding which room to worry about first. A lab-confirmed, accredited result is what you need before you renovate, sell, or make any claim that could end up in front of a lawyer, a real-estate lawyer, or a tenant.
— Moacyr
Get certified testing and remediation done right
If lead paint testing points to a hazard, or you’re already planning renovation work on an older property, a certified contractor can give you a faster route than piecing together a kit, a lab, and a separate remediation crew on your own. One certified contractor handles the testing, sampling, and lab coordination and, if needed, the abatement and clearance testing that follows, so you’re not managing three vendors and three sets of paperwork for one problem.

That matters most for anyone facing a renovation deadline or a sale closing date, where a slow, fragmented process can cost you weeks. Certified technicians work with accredited labs and document every step, from initial sampling through to final clearance, giving you one written record instead of scattered receipts and text messages. If you’ve found deteriorating paint, are planning a renovation on a pre-1990 home, or need results a buyer’s lawyer won’t question, reach out to book a certified hazardous-material assessment and get a written plan before you touch a single wall.
This article is general information, not a substitute for advice from a qualified doctor. Consult a qualified healthcare professional about your own circumstances before acting on anything here.
Sources
- Lead-based paint
- Lead & Heavy Metals Analysis
- Spot-test kits for detecting lead in household paint: laboratory evaluation
- Chapter 7: Lead-Based Paint Inspection, Guidelines for the Evaluation and Control of Lead-Based Paint Hazards in Housing
FAQ
What is the easiest way to test for lead paint?
A home test kit is the easiest first step for screening a suspect surface, but treat a positive result as preliminary. Confirm it with a paint-chip sample sent to an accredited lab, since NIST’s evaluation found meaningful accuracy differences between kit brands.
How bad is one exposure to lead paint?
Risk depends far more on paint condition and dust exposure than on a single brief contact. Intact paint that isn’t deteriorating or generating dust presents much lower risk than chipping or sanded paint, which is why Health Canada frames hazard around exposure pathways rather than presence alone.
How do I tell if paint has lead in it?
You can’t reliably tell by looking. A certified XRF survey, a lab-tested paint chip, or at minimum a validated home kit is the only way to know, since paint colour, age, and appearance aren’t dependable indicators on their own.
Is lead-based paint safe to use in Canada?
Lead was restricted in residential paint sold in Canada decades ago, so lead-based paint isn’t used in new construction or products today. Existing lead paint in older homes isn’t automatically dangerous if it’s intact and undisturbed, but it becomes a hazard once it chips, peels, or gets sanded.