

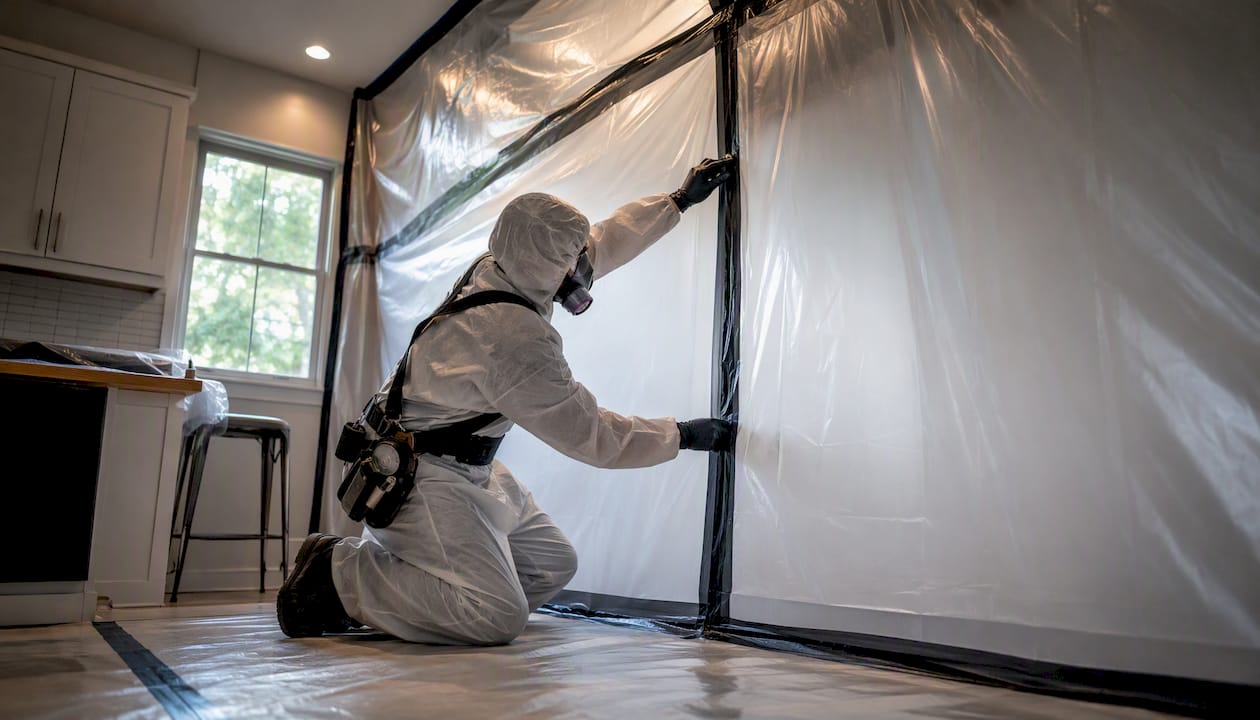
The regulated asbestos removal process in Canada follows a fixed six-phase sequence: inspection and bulk sampling, project planning and regulatory notification, physical containment and HVAC isolation, wet removal with full worker controls, cleaning and manifested waste disposal, and finally independent air monitoring before anyone re-enters the space. Skip or compress any phase and you are not just cutting corners — you are likely in violation of provincial regulations and creating a liability that follows the property indefinitely.
Health Canada is clear that there is no known safe level of asbestos exposure. That single fact drives every procedural requirement below.
What to expect from a compliant abatement project:
- Inspection and sampling: a licensed inspector confirms which materials contain asbestos before any work begins
- Planning and notification: a written scope, contractor licence verification, and advance notice to the regulator where required
- Containment and HVAC isolation: poly barriers, airlocks, and sealed ductwork before the first material is disturbed
- Wet removal: hand removal using amended water; dry abrasion and power tools are prohibited
- Cleaning, packaging and waste manifesting: HEPA vacuuming, double-bagged waste, and a signed manifest to an approved landfill
- Independent air clearance: a third-party monitor samples the air and issues a written clearance report before re-occupancy
If you are a homeowner or property manager and the work involves friable asbestos-containing material (ACM), you need a licensed abatement contractor. The asbestos removal process is a regulated, documented operation, not a cleaning job.
Pro Tip: Keep every document the contractor produces: the bulk sample chain-of-custody, the waste manifest, and the final clearance report. These are permanent property records that matter at resale and for insurance claims.
Key takeaways
The asbestos removal process in Canada is a regulated, six-phase sequence that requires licensed contractors for friable work, independent air clearance before re-occupancy, and permanent documentation at every step.
| Point | Details |
|---|---|
| Six-phase sequence | Every compliant project runs: inspection → planning/notification → containment → wet removal → cleaning/waste disposal → independent clearance. |
| Classification drives controls | Type 3 (friable) work requires a licensed contractor, full negative-pressure enclosure, and formal regulatory notification. |
| Clearance threshold | Re-occupancy requires independent PCM air samples at ≤0.01 f/cc; AHERA school projects may require TEM at 70 s/mm². |
| Documentation is permanent | Waste manifests, bulk sample reports, and clearance letters are property records that matter at resale and for insurance claims. |
| MSN Environmental | Provides licensed inspection, removal, waste manifesting, and clearance coordination for residential and commercial properties across Ontario. |
Table of Contents
- 1. How asbestos is confirmed: inspection and bulk sampling
- 2. Work classifications and how they change your project requirements
- 3. Preparing the work area: containment and HVAC isolation
- 4. PPE and respiratory protection requirements for workers
- 5. Removal techniques: wet methods, glovebag, and what is prohibited
- 6. Cleaning, decontamination and waste handling
- 7. Air monitoring and clearance testing before re-occupancy
- 8. Regulatory requirements and notifications across Canada
- 9. Why a licensed abatement contractor protects you
- 10. Field perspective: what experienced crews find on residential projects
- 11. What MSN Environmental does and how to get started
- Sources
- FAQ
1. How asbestos is confirmed: inspection and bulk sampling
Always confirm with licensed bulk sampling before assuming a material contains asbestos. Visual identification alone is not reliable and, in most Canadian provinces, is not legally sufficient to trigger or dismiss abatement requirements.
A licensed inspector visits the site, documents suspect materials with photographs, and prepares a written inventory. Common targets include popcorn ceilings, pipe insulation, vinyl floor tiles, drywall joint compound, and roofing felt in homes built before 1990. The inspector takes small bulk samples using amended water to suppress fibres during collection, seals each sample in two separate containers, and logs them on a chain-of-custody form before sending them to an accredited laboratory.
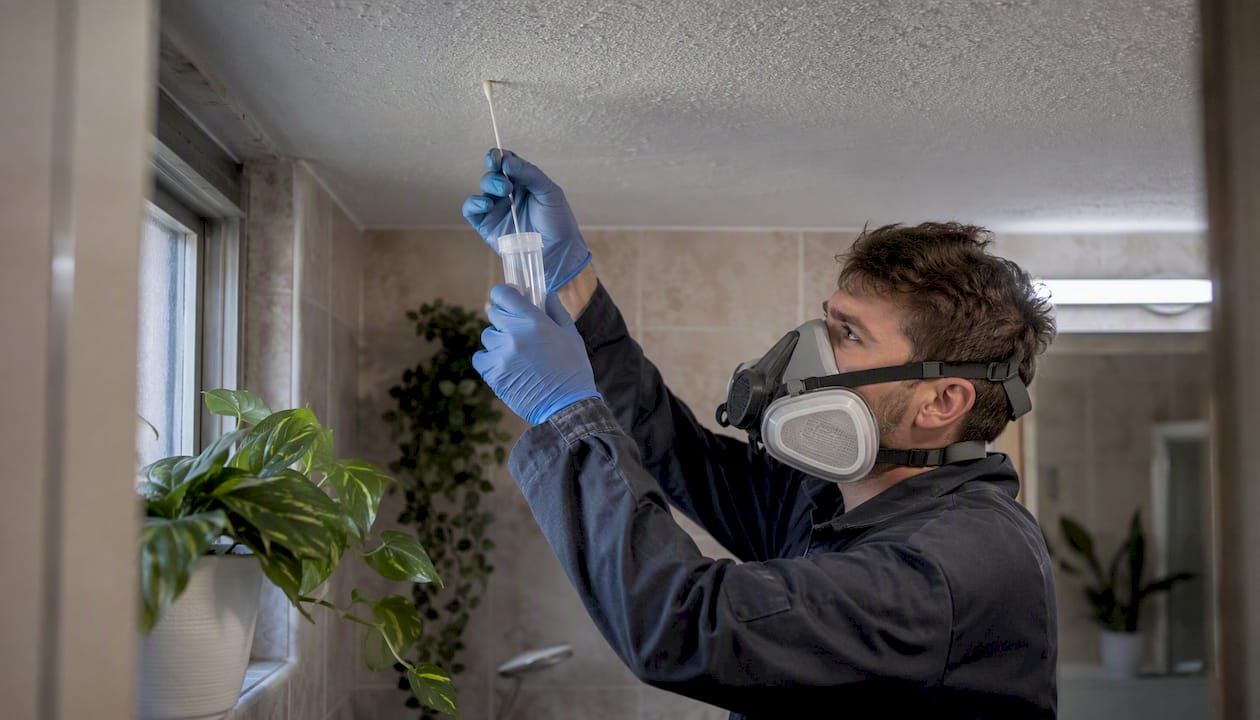
Two lab methods are standard. Polarised Light Microscopy (PLM) is the workhorse for most bulk samples: fast, cost-effective, and sufficient for the majority of residential projects. Transmission Electron Microscopy (TEM) is reserved for ambiguous results or sensitive projects such as schools, where higher analytical precision is required. Turnaround is typically two to five business days for standard PLM, with rush options available.
Homeowners can do an initial visual walkthrough to flag suspect materials, but DIY sampling is discouraged and restricted in several provinces. Disturbing ACM without controls releases fibres. The small cost of professional asbestos testing is trivial compared to the cost of remediating a contaminated living space.
Documents to request with your lab results:
- Signed chain-of-custody form matching sample IDs to the lab report
- Lab accreditation certificate (look for NVLAP or a provincially recognised equivalent)
- Written inspector report with photo log and material inventory
- Clear identification of friable versus non-friable materials
Pro Tip: Ask specifically for NVLAP-accredited lab results. Accreditation means the lab’s methods and quality controls have been independently verified — it is the difference between a result you can defend and one you cannot.
2. Work classifications and how they change your project requirements
The classification of the work determines the minimum controls required, whether a licensed crew is mandatory, and whether formal notification to a regulator is needed before work starts. Getting the classification wrong is one of the most common mistakes property owners make when trying to manage scope and cost.
Most Canadian provinces use a tiered system broadly aligned with the federal and OSHA work-class framework. The three tiers are typically described as follows:
Type 1 (low-risk, small-scale): Minor disturbance of non-friable ACM, such as drilling a small hole through vinyl floor tile or removing a small section of intact ceiling tile. Fibre release potential is low. Basic PPE, wet methods, and careful clean-up are required, but a full negative-pressure enclosure generally is not.
Type 2 (medium-risk): Removal of non-friable ACM in quantities above the Type 1 threshold, or work that may render the material friable. Examples include removing vinyl floor tiles across a large area or cutting through drywall with joint compound. A mini-enclosure or critical barriers are typically required, along with a half-face respirator with P100 cartridges.
Type 3 (high-risk, friable): Removal of friable ACM such as sprayed-on fireproofing, pipe insulation, or damaged popcorn ceilings. This is the category that requires a full negative-pressure enclosure, supplied-air or powered air-purifying respirators, a licensed contractor, and formal regulatory notification. Independent air monitoring is mandatory.
Common residential scenarios and their likely classification:
- Intact popcorn ceiling, small patch repair: Type 1 or 2 depending on area and condition
- Full popcorn ceiling removal: Type 3 (friable, large area)
- Vinyl floor tile removal, intact: Type 2
- Pipe insulation removal: Type 3 (friable)
- Drywall joint compound, small repair: Type 1 or 2
Classification also affects notification timelines. Type 3 work typically requires advance written notice to the provincial regulator before work begins. Ontario’s O. Reg. 278/05 sets out specific notification requirements tied to the quantity of material and the type of operation. Alberta’s Asbestos Abatement Manual provides comparable guidance for that province.
3. Preparing the work area: containment and HVAC isolation
Containment and HVAC isolation are the first physical controls that must be in place before any ACM is disturbed. Nothing else in the removal sequence works if fibres can migrate to adjacent spaces through gaps in barriers or through the building’s air-handling system.
Step-by-step containment set-up:
- Establish the work zone boundary. Post warning signs and barricades at all entry points. Restrict access to trained workers only.
- Shut down and isolate HVAC. Turn off all air-handling units serving the work area. Seal supply and return ducts with poly sheeting and tape. Do not restart the system until clearance is confirmed.
- Seal all openings. Cover doorways, windows, electrical outlets, and any penetrations with two layers of 6-mil poly sheeting, taped at all edges.
- Erect critical barriers. Frame and poly-sheet the work zone walls and ceiling. Floor protection goes down first: two layers of poly on the floor, extending up the walls and taped.
- Install the decontamination unit. A three-chamber airlock (equipment room, shower room, clean room) at the single entry/exit point is standard for Type 3 work. Workers decontaminate on exit; no contaminated clothing or equipment leaves the work zone without going through the decon unit.
- Set up negative-air machines. HEPA-filtered negative-air units exhaust air from inside the enclosure to the outside, maintaining lower pressure inside the work zone than in adjacent areas. For high-risk enclosures, the target is at least four air changes per hour through HEPA filters.
- Smoke-test the enclosure. Before removal begins, a smoke pencil test verifies that air flows into the enclosure at all seams and that there are no outward leaks.
Equipment you should expect to see on a compliant Type 3 site:
- 6-mil poly sheeting (floor, walls, ceiling)
- Spray adhesive and duct tape rated for poly
- HEPA negative-air machines sized to the enclosure volume
- Three-chamber decontamination unit
- Warning signs meeting provincial labelling requirements
- Smoke pencils or equivalent for integrity testing
Pro Tip: Ask the contractor to show you the smoke-test results before removal begins. A responsible crew will document this step. If they cannot, the enclosure integrity is unverified.
4. PPE and respiratory protection requirements for workers
Workers must wear purpose-rated PPE and respiratory protection matched to the work classification. As a property owner or manager, you have the right to request documentation confirming that every worker on site is trained, fit-tested, and equipped correctly before work starts.
Minimum PPE for Type 2 and Type 3 operations:
- Full-body disposable coveralls (Tyvek or equivalent), taped at wrists and ankles
- Nitrile or rubber gloves, taped to the suit
- Disposable boot covers or rubber boots dedicated to the work zone
- Safety glasses or goggles under the respirator
- Half-face respirator with P100 (HEPA) cartridges for Type 2 work
- Full-face negative-pressure respirator with P100 cartridges, or a powered air-purifying respirator (PAPR), for most Type 3 work
- Supplied-air respirator (SAR) for the highest-risk Type 3 operations such as sprayed fireproofing removal
Respirator fit-testing is not optional. Workers must be fit-tested annually for the specific make and model of respirator they use on site, and the fit-test record must be available for inspection. A respirator that has not been fit-tested provides no reliable protection.
Worker controls go beyond equipment. Buddy systems are standard on Type 3 projects: no worker enters the enclosure alone. Entry and exit follow a strict decontamination protocol — wet-wipe suits, remove outer gloves, shower, bag contaminated PPE inside the decon unit before leaving. On-site supervision by a qualified person is required for licensed work, and worker exposure monitoring (personal air sampling) may be required depending on the scope and provincial rules.
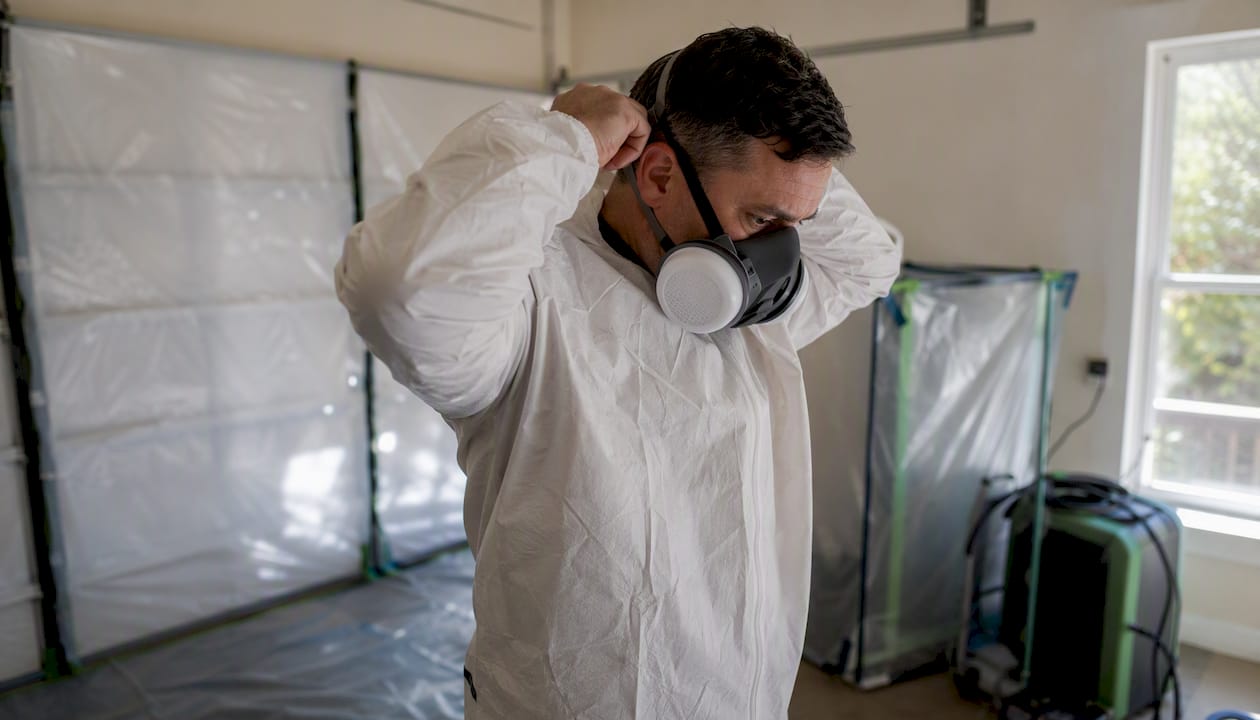
Pro Tip: Before work starts, ask the contractor for respirator fit-test records and worker training certificates. A licensed crew will have these on file. If the answer is vague, that is a signal worth acting on.
5. Removal techniques: wet methods, glovebag, and what is prohibited
Wet methods and controlled manual removal are the standard for the asbestos abatement process. Dry abrasion, sanding, and high-speed power tools without full HEPA containment are prohibited under Canadian provincial regulations and the work-practice standards that inform them.
The reason is straightforward: dry cutting or grinding ACM generates a cloud of respirable fibres. Wet methods suppress fibre release at the source by saturating the material before and during removal.
Step-by-step wet removal:
- Pre-wet the material thoroughly with amended water (water mixed with a surfactant to reduce surface tension and improve penetration). For dense materials like pipe insulation, injection or saturation techniques may be needed to reach the substrate.
- Allow adequate soak time. The goal is penetration, not just surface wetting.
- Remove material slowly by hand, keeping it wet throughout. Work in small sections.
- Place removed material directly into a labelled waste bag without shaking or dropping it.
- Seal the inner bag, wipe it down, place it in a second outer bag, and seal that too.
- Stage double-bagged waste inside the work zone until final removal through the decon unit.
Glovebag technique is used for small-diameter piping and fittings where erecting a full enclosure is impractical. A pre-fabricated poly bag with built-in gloves is sealed around the pipe section. The worker wets and removes the insulation from inside the bag without breaking containment, then seals and removes the bag as waste. Glovebags are limited to accessible, small-diameter pipe runs and are not appropriate for large-scale or overhead work.
For large-scale mechanical or demolition projects, controlled demolition approaches use the same wet-method principles with additional engineering controls: isolating adjacent areas, sequencing removal to limit simultaneous disturbance, and using HEPA-equipped mechanical tools where manual removal is not feasible.
Wet removal with surfactant-enhanced amended water is technically distinct from simply spraying water on a surface. The surfactant reduces surface tension so the water actually penetrates the ACM rather than beading on it. On dense pipe insulation or thick floor-tile adhesive, this distinction determines whether fibre suppression actually works — or just looks like it does.
Do not use list:
- Dry scraping or sanding
- Angle grinders, circular saws, or rotary tools without full HEPA containment
- Compressed air to clean surfaces
- Running building HVAC during removal
- Household vacuum cleaners (they exhaust fibres back into the air)
For asbestos floor tile removal, wet methods combined with careful hand-lifting and immediate bagging are the standard approach. Scoring or breaking tiles dry is not acceptable.
6. Cleaning, decontamination and waste handling
Proper decontamination and waste handling convert contaminated material into regulated waste that must be tracked from the jobsite to an approved landfill with a signed manifest. The cleaning phase is not a formality — it is a regulatory requirement and the last line of defence before clearance air sampling begins.
Final cleaning sequence:
- Remove all bulk waste from the work zone through the decon unit. All waste bags must be wiped down before leaving the enclosure.
- HEPA-vacuum all surfaces inside the enclosure: walls, floor, ceiling, and any equipment that will leave the zone.
- Wet-wipe all surfaces with amended water after HEPA vacuuming.
- HEPA-vacuum again. This two-pass approach (vacuum, wet-wipe, vacuum) is standard for Type 3 clearance preparation.
- Remove the inner poly layers from the enclosure, fold them inward to trap any residual debris, double-bag, and label as asbestos waste.
- HEPA-vacuum and wet-wipe the outer poly layer before removing it.
- Remove and bag all remaining containment materials.
Waste packaging requirements:
- Inner bag: 6-mil poly, labelled with the OSHA/NESHAP asbestos danger label (or provincial equivalent)
- Outer bag: second 6-mil poly bag, same labelling
- Each bag sealed with tape and labelled with the generator’s name, address, and date
- No bag to exceed a manageable weight for safe handling
The waste manifest is the chain-of-custody document that follows the waste from the jobsite to the transporter to the approved landfill. All three parties sign it. Ontario’s O. Reg. 278/05 requires that these records be retained, and failure to produce them can constitute a regulatory violation. Keep copies permanently in your property file.
What to collect from your contractor at project close:
- Signed waste manifest with transporter and landfill signatures
- Disposal receipts from the approved landfill
- Copies of all bulk sample lab reports with chain-of-custody forms
- The contractor’s written removal control plan
- The independent clearance report (covered in the next section)
7. Air monitoring and clearance testing before re-occupancy
Re-occupancy is only permitted after an independent monitor issues a written clearance report showing fibre counts below the applicable threshold. The contractor cannot perform this testing themselves — independence is a regulatory and ethical requirement, because the contractor has a financial interest in the project being declared complete.
PCM vs. TEM: which test and when
Phase Contrast Microscopy (PCM) is the standard clearance method for most residential and commercial projects. It is fast (same-day results are possible) and cost-effective. The common clearance threshold for PCM is ≤0.01 fibres per cubic centimetre (f/cc). PCM counts all fibres above a certain size, not just asbestos fibres, which makes it a conservative screen.
Transmission Electron Microscopy (TEM) provides fibre-type identification and is required for school projects under AHERA and for projects where the PCM result is ambiguous. For AHERA school clearance, the TEM structural criterion is 70 structures per square millimetre (s/mm²). TEM is slower and more expensive but gives a definitive answer on fibre type.
The clearance sampling procedure itself is deliberately aggressive. Before sampling, the independent monitor uses HEPA vacuums and fans to disturb the air inside the enclosure, simulating worst-case conditions. The goal is to dislodge any fibres that settled during cleaning so they are airborne during sampling. If the area passes under these conditions, it will pass under normal occupancy. Independent clearance testing must be performed by a third-party consultant with no contractual involvement in the removal work.
Air monitoring also serves worker protection during the project itself. Personal air sampling checks individual worker exposure against action levels, while area monitoring inside and outside the enclosure validates that containment is holding. If area samples outside the enclosure show elevated counts, work stops and containment is repaired before continuing.
Pro Tip: Ask for the independent monitor’s lab accreditation certificate and a copy of the clearance report before releasing final payment to the contractor. The clearance report is your proof that the space is safe to re-enter.
8. Regulatory requirements and notifications across Canada
Regulated asbestos abatement in Canada requires advance notification for work above threshold quantities, a licensed or certified contractor for friable work, and documentation retained as a permanent record. The specifics vary by province, but the underlying logic is consistent.
Federal framework: The NESHAP work-practice standard, referenced in many provincial guidelines, requires written notification at least 10 working days before demolition or abatement for work that meets regulated quantity thresholds. This notification goes to the relevant authority and must describe the scope, methods, and contractor.
Ontario: O. Reg. 278/05 under the Occupational Health and Safety Act governs asbestos on construction projects and in building repair operations. It sets out Type 1, 2, and 3 operation definitions, notification requirements for Type 3 work, and contractor licensing expectations. The Ministry of Labour, Immigration, Training and Skills Development maintains the relevant guidance and licence registry. Owners should verify their contractor holds a valid Ontario asbestos abatement licence before signing a contract.
Alberta: The Alberta Asbestos Abatement Manual, published by Alberta Occupational Health and Safety, sets out best-practice controls and reporting expectations for abatement projects in that province. It covers inspection, classification, notification, containment, and clearance in a format aligned with the provincial regulatory framework. Contractors working in Alberta should be familiar with this manual and owners should ask for it by name when reviewing a contractor’s methodology.
Owner compliance checklist:
- Confirm the contractor holds a valid provincial asbestos abatement licence
- Obtain copies of all regulatory notifications filed before work begins
- Verify the notification was submitted the required number of working days in advance
- Retain all manifests, notifications, and clearance reports permanently
- Check your provincial regulator’s website for current licence lists and notification forms
9. Why a licensed abatement contractor protects you
Licensed abatement contractors deliver regulatory compliance, documented chain-of-custody, and independent clearance that property owners cannot replicate safely on their own. This is not a sales point — it is the practical reality of what the asbestos remediation process requires.
What a professional brings to a project:
- Accredited bulk sampling with NVLAP-recognised lab results and signed chain-of-custody
- Engineered containment: poly barriers, airlocks, and HEPA negative-air machines sized to the enclosure
- Trained, fit-tested workers with documented PPE and respirator records
- A written asbestos removal control plan prepared before work begins, as required under licensed removal standards
- Wet removal methods with surfactant-enhanced amended water
- Manifested waste disposal to an approved landfill
- Coordination with an independent third-party monitor for clearance
The liability argument is equally concrete. A clearance letter and a complete waste manifest are documents a lawyer, insurer, or buyer’s home inspector can verify. Without them, a property owner faces the possibility of having to repeat the entire abatement process at their own expense to satisfy a future transaction or insurance claim.
Homeowners often mistake asbestos removal for a cleaning job. It is not. It is an engineered hazardous-materials operation built around one goal: preventing fibres from becoming airborne in the first place. Every step — the wet methods, the negative pressure, the decontamination protocol — exists because once fibres are in the air, you cannot get them back.
The workflow for a well-run project looks like this: a licensed inspector confirms ACMs and produces a written report → the abatement contractor prepares a removal control plan and files regulatory notifications → the crew executes containment, removal, and waste manifesting → an independent monitor performs clearance sampling → the owner receives a complete documentation package.
Pro Tip: Request proof of licence, current liability insurance, worker training certificates, and the contractor’s NVLAP lab partnership before signing anything. A contractor who cannot produce these documents quickly is not ready to work on your property.
Requesting certified hazardous material removal professionals is the single most effective way to reduce downstream disputes, hidden costs, and regulatory exposure.
10. Field perspective: what experienced crews find on residential projects
Experienced abatement crews commonly encounter hidden ACMs, undocumented renovations, and HVAC cross-contamination that were not visible during the initial inspection. Planning for these contingencies is what separates a well-managed project from one that blows its budget and timeline.
Common surprises on residential projects:
- Hidden pipe insulation behind drywall or inside ceiling cavities, often discovered only when walls are opened for containment
- Layered flooring: a new vinyl layer installed over original asbestos floor tiles, which means the top layer must be removed carefully before the ACM underneath can be addressed
- Popcorn ceiling patchwork: sections repaired with non-asbestos compound over original asbestos-containing texture, requiring the inspector to sample both materials separately
- Undocumented HVAC connections that link the work area to clean zones, discovered when smoke-testing reveals unexpected air pathways
Each of these surprises can expand the scope of work, extend the timeline, and require a revised notification to the regulator. A preliminary walkthrough with the inspector, combined with sharing any renovation records you have for the property, reduces the chance of mid-project discoveries.
Realistic timeline expectations for a residential Type 3 project: allow two to four weeks from initial inspection to clearance confirmation. The inspection and lab results typically take three to seven days. Notification waiting periods add up to ten working days for regulated work. The physical removal itself may take one to three days for a typical residential scope, but clearance sampling and lab turnaround add another two to five days after that.
Temporary relocation is often necessary for Type 3 work in occupied homes. Discuss this with your contractor before the project starts, not during containment set-up.
11. What MSN Environmental does and how to get started
If your project involves friable asbestos or regulated quantities of ACM, the right move is to contact a licensed abatement contractor. MSN Environmental provides the full scope of services that a compliant asbestos removal process requires: asbestos testing and inspection, engineered containment and removal, independent clearance coordination, and complete documentation for residential, commercial, and industrial properties across Ontario.
Every MSN Environmental project starts with a site inspection and written scope. From there, the team handles regulatory notifications, containment set-up, wet removal by trained and certified technicians, waste manifesting to approved landfills, and coordination with a third-party monitor for air clearance. At the end of the project, you receive the full documentation package: bulk sample reports, waste manifests, disposal receipts, and the clearance letter.
What to ask any contractor before signing:
- Valid provincial asbestos abatement licence
- Current liability insurance and WSIB clearance
- Worker training certificates and respirator fit-test records
- NVLAP-accredited lab for bulk sampling
- Written removal control plan provided before work starts
- Independent third-party monitor for clearance (not the same company doing the removal)
MSN Environmental serves homeowners and property managers across Ontario, including Toronto, Kitchener, Waterloo, and surrounding communities. To get a quote or book an inspection for your asbestos removal project, contact the team directly through the website.
Sources
The following sources provide official guidance on asbestos abatement requirements in Canada. Check your provincial regulator’s website for current licence lists and notification forms specific to your jurisdiction.
- Abatement of Asbestos: Inspection-to-Clearance Process – InspectandTest
- Asbestos Abatement Protocol: Containment, Removal, and Air Monitoring – Restoration Intel
- Asbestos Abatement and Removal Procedures: A 6-Phase Guide (2026)
- How to safely remove asbestos Code of Practice 2021
- Regulation respecting asbestos on construction projects and in buildings and repair operations (Ontario)
This article is general information, not a substitute for advice from a qualified doctor. Consult a qualified healthcare professional about your own circumstances before acting on anything here.
FAQ
What is the procedure for removing asbestos in Canada?
The asbestos removal process follows six regulated phases: inspection and bulk sampling, project planning and regulatory notification, physical containment and HVAC isolation, wet removal with full worker controls, cleaning and manifested waste disposal, and independent air clearance before re-occupancy. For friable ACM, a licensed contractor is required under provincial regulations such as Ontario’s O. Reg. 278/05.
Can you safely remove asbestos yourself in Canada?
DIY removal of friable asbestos is not permitted under most Canadian provincial regulations and is strongly discouraged for any ACM. Type 3 (friable) work legally requires a licensed abatement contractor, engineered containment, and independent clearance testing. Homeowners who disturb ACM without proper controls risk both serious health consequences and regulatory liability.
How long after asbestos removal is it safe to re-enter the space?
Re-occupancy is only permitted after an independent third-party monitor collects air samples and issues a written clearance report confirming fibre counts are at or below the applicable threshold, commonly ≤0.01 fibres per cubic centimetre by PCM. From the end of physical removal, clearance sampling and lab turnaround typically add two to five additional days before a clearance letter is issued.
Is 30 minutes of asbestos exposure harmful?
Health Canada’s position is that there is no known safe level of asbestos exposure. Short-duration exposures carry lower statistical risk than prolonged occupational exposure, but no single exposure event can be declared categorically safe. The entire asbestos abatement process is designed around preventing any fibre release, because the risk accumulates with each exposure event over a lifetime.